
The Hooter
a Hot, New Sail
 with all the trimmings
by Rick White,
This is an article as published in Catamaran Sailor NewsMagazine and the new booklet of how to assemble the entire rigging.
Every macho skipper wants a spinnaker! More speed! More fun! But, most crew do not want the hassle of having to perform the perfect spinnaker set (without flogging it to death)! The flawless jibe, without an hourglass (the spinnaker all twisted)! The infallible take down, without �shrimping� in the process (dragging the spinnaker through the water under the boat)! In other words, the foredeck person on the beach cat gets yelled at enough without adding to that a huge, uncontrollable, hard-to-deal-with spinnaker that will most certainly cause more �Chinese-Fire-Drills� aboard the boat. �Let�s just sail with the jib and main � it�s fast enough this way,� the crew is most certain to say.
�Ah! But the Times, They are a Changing!� as Bob Dylan would say. At last there is an extra headsail you can put on that beach cat that makes life easy and fun.
- You don�t ever have to worry about doing a perfect spinnaker set � you simply release a line and it unfurls!
- You don�t ever have to worry about an hourglass during a jibe � with specially-designed Harken Ratchamatic Blocks and the sail design itself, it is virtually impossible to screw up the jibe/tack!
- You don�t ever have to worry about dragging the sail in the water during a take-down � you simply pull on the 1:2 ratio furler line and bingo the sail is comfortably out of the way!
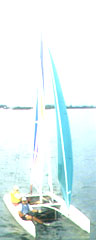
What is the miracle? It is the Hooter System!
The Hooter is a large, spinnaker-like, and/or genoa-like headsail
that mounts at the end of a bowsprit (pole) and is roller furling. The
sail is designed to not only sail off the wind (reaches and downwind),
but to actually go to weather in lighter winds of 10 mph or under.
Sailing The Triangles
Right off the start in lighter winds you simply furl the jib, unfurl
the Hooter and hoot off away from the stock boats. After
rounding the weather mark and onto a reach, simply ease the sheets and
unfurl the jib. You can now use the double-slot effect to gain more power
and speed. After rounding the reaching mark and heading downwind you will
find that the Hooter is as fast and often faster than the
standard spinnaker.
Suppose the wind had piped up to around 12 mph. At this point you
know that you will not be able to carry the Hooter to weather
anymore. So, just before getting to the leeward mark, simply furl the
Hooter, and as you round the mark, sheet in the main and
jib. When you reach the weather mark again, simply unfurl the Hooter
and off you go again. It�s a hoot!
Going Upwind
For the past few years I have been experimenting and working with
this concept. Purposely, I have not had crew that were strong and macho,
rather I have sailed with small girls of 115lbs or less, and even once
with my 8-year-old grandson, who had never sailed before. The more I understood
the sail, the better and better the race results became.
Here is one of the first things I learned. Julia Langford and I
used the Hooter in the fall of 1996. She had no problems
at all sheeting in the sail, or furling it. The sail worked great in heavier
winds downwind and also in extremely light air when going to weather.
However, we discovered then that she could not sheet in the sail for a
beat in winds exceeding 5 mph. We could have used the Hooter to weather
except for that problem.
 That
problem was solved. We came up with an idea that I called �Doubling.�
We no longer dead end the sheets at the clew of the Hooter. Instead, we
put pigtails with small turning blocks on the clew of the big sail, and
then run the bitter ends of the sheets through the turning blocks and
then tie a stopper knot with about 6" of bitter end sticking out
to use for a handle. (See Picture to the left)
That
problem was solved. We came up with an idea that I called �Doubling.�
We no longer dead end the sheets at the clew of the Hooter. Instead, we
put pigtails with small turning blocks on the clew of the big sail, and
then run the bitter ends of the sheets through the turning blocks and
then tie a stopper knot with about 6" of bitter end sticking out
to use for a handle. (See Picture to the left)
Meanwhile, right behind the turning blocks on 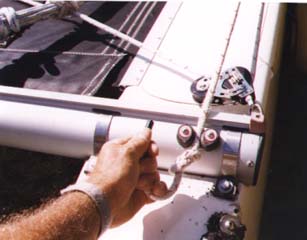 the rear beam are open cam cleats.
Now, when we need more power to sheet in the Hooter, the crew simply grabs
the bitter end of the burdened sheet and pulls it back to the beam and
cleats it. (See Pictures to the left and below) Now you have a 2:1 purchase
for sheeting while beating. This can also be used on reaches and even
downwind in very heavy air � anytime it gets hard to sheet with only 1:1
purchase.
the rear beam are open cam cleats.
Now, when we need more power to sheet in the Hooter, the crew simply grabs
the bitter end of the burdened sheet and pulls it back to the beam and
cleats it. (See Pictures to the left and below) Now you have a 2:1 purchase
for sheeting while beating. This can also be used on reaches and even
downwind in very heavy air � anytime it gets hard to sheet with only 1:1
purchase.
When jibing or tacking, the crew simply pops the sheet out of the
cleat and the it is back to 1:1 purchase as any other system. You certainly
 can't keep it a 2:1 because you would have
twice as much sheet (and drag) to go all the way around to the other side.
can't keep it a 2:1 because you would have
twice as much sheet (and drag) to go all the way around to the other side.
Due to this innovation we can now carry the Hooter in winds nearing
10 mph, go much faster than the stock boats, and point higher as well.
We have actually been double trapped in winds a little over 5 mph. It
is something to behold.
With the doubling system, however, we found that tacks were pretty slow.
With a little practice they can get pretty fast. But, in winds between
5 and 7 where the crew cannot quite sheet the Hooter in by herself, I
have the crew sheet as hard as possible and then cleat it. At this point
I am usually sitting in a position half way between the cleat and the
turning block.
So, I pull toward myself at the middle of the sheet between the cleat
and turning block and the crew then takes up the slack. We do that a couple
of times and the sail is usually in pretty tight. This is much quicker
than doubling and sort of resembles a 2:1 purchase.
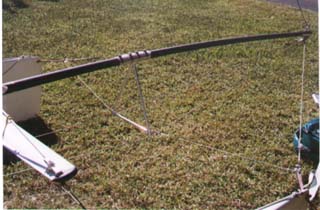
When going to weather, however, you must use non-stretch halyard and
really honk down on the it. The luff of the Hooter now becomes
your forestay. This makes for a lot of pressure on the bowsprit, so a
strong, well-designed pole is very important. I am now on my 3rd pole
and finally have it right.(See Picture left and below, however our newest
model is no longer tapered and much less flexible)
Sailing Off the Wind
I suppose the reason the Hooter works so well downwind
is because of the discovery of the �Wild Thing.� For the Wild Thing the
skipper must sail the boat a little higher than the �Mild Thing� to gain
speed and get the hull out of the water. Once that happens, the apparent
wind moves forward (making the bridlefly, masthead or sidestay telltale
flow more aft) which means you can sail deeper. By the time you
get it all up, running and working, you can sail almost as deep doing
the Wild Thing as you can with the Mild Thing.
The same seems to work for the Hooter. My worst performances
with the Hooter have been when I was sailing alongside of a competitor
with a spinnaker. I keep trying to sail it like a spinnaker � and it doesn�t
work. You really need to go a little higher at first and then when the
apparent wind begins to move forward, you can head down to a deeper course.
You should use both the jib and Hooter together.
This gives you a double slot effect and more sail area for more speed.
Funny how it works, but if you could mount a bridle-fly near each sail,
each would be reading a different apparent wind. I found that a telltale
mounted on the end of the bow sprit showed the apparent wind at about
10 degrees aft of perpendicular (90 degrees). Yet the telltales on my
sidestays were pointing aft by 40 degrees.
The Hooter backwinds the jib, so it must sheeted
in more than if the Hooter wasn�t there. And the jib backwinds
the main, so it must be sheeted in more. With this system the main traveler
is rarely let out more than few inches. The main seems to be going to
weather all the time � upwind of course, but then even downwind once the
sails are trimmed properly and the apparent wind is flowing aft.
M.B. Villa sailed with me in the 1997 Mug Race in Jacksonville.
It was downwind all the way and the winds were heavy and gusty in the
St. Johns River. We never had to even think about whether or not to use
the Hooter. If it was marginal, we would simply unfurl the
sail and try it out. If it was too much out of control, we would simply
furl it again. With a spinnaker it would be a tough decision wheter or
not to go through all the Chinese firedrills for nothing -- put it up
with a struggle, take it down with even more struggle. We just used the
Hooter like a windowshade -- let it out. Naw! Too much wind,
so roll it back up in a heartbeat.
The others with spinnakers had to think long and hard about whether
or not to attempt a spinnaker launch. And when they did launch and then
have to do a take down, the boat had to be single-handed until the crew
could get the spinnaker packed � not good when there are lots of puffs.
Were we faster? Well, we capsized due to my mental error on an
unrelated subject that I am reluctant to talk about. And we still finished
4th � with about 50 spinnakers behind us. Yes, there were 3 spinnakers
ahead of us, but that�s still not bad, eh?
In most cases we have been one of the top boats in distance races
using the Hooter. Sure, there have been some spinnakers
ahead of us, but there were a lot more behind us. And the more I learned
about the sail and how to use it, the faster it became.
Even more recently at the 1999 Sandusky to Put-in-Bay Steeplechase we
were nearly 2/3 of the 22-mile course before the 2nd place boat had rounded
the 1/3 mark. When the wind began to be too gusty and we needed to reach
more, we simply roller-furled the Hooter and began reaching to the finish
line. We did capsize and lost the race, but that again was pilot error,
not a Hooter error.
A War Story
When I first discovered the concept, it was during the 2nd Annual
Bay to Ocean Race in Marathon, Florida. It had been a very no-air day
and the fleet had only gone about 10 miles in 5 hours. So, the RC dropped
a mark and told us round that mark and head back to the start line (now
the finish line).
To the dismay of most of the fleet, the RC dropped the mark right in front
of Robert Onsgard, who was sporting a large spinnaker on his Nacra 6.0NA.
Off he went downwind. Robert was nine minutes ahead of us when we finally
rounded the mark. In light winds, and with a little version of a Hooter,
we reeled in Robert and passed, finishing about 12 minutes ahead of him.
And that was a with a small sail that was designed for a Nacra 5.5Uni.
I immediately ordered a larger sail of similar cut.
More Problems to Solve
The next problem we ran into was during the Key Largo Steeplechase.
The first leg of the course was about 15 miles straight upwind. I didn�t
want the drag of the furled sail out there in front of us for such a long
way, so Joe Thrasher and I decided to coil the Hooter up
on deck. With the Harken furler that we had, we managed to mess up the
furling retriever line � it tangled hopeless around the sail and the tack
line, above and below the furler � none of it seemingly went inside the
furler. So, we had to set it like a spinnaker when we finally reached
the point that we could head downwind.
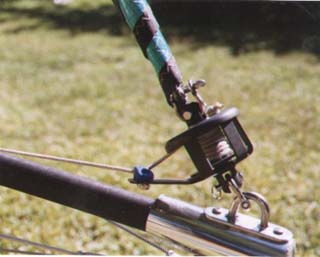 Harken came
up with an answer to that problem � a furler drum with a feeder attached
that allows the furler line to only feed into the furler drum. We also
made sure that there was no swivel on the tack line � that allowed the
furler to stay in one position and not spin around, thereby fouling itself.
(See Picture to the left)
Harken came
up with an answer to that problem � a furler drum with a feeder attached
that allows the furler line to only feed into the furler drum. We also
made sure that there was no swivel on the tack line � that allowed the
furler to stay in one position and not spin around, thereby fouling itself.
(See Picture to the left)
And Another Problem
When you want to furl the Hooter, you want to do
it fast. Just like a spinnaker, it is a good idea to head a little deeper,
blanketing the headsail with the mainsail, and then quickly furl. With
both Julia and M.B. we had a problem with getting the sail furled quickly.
First of all the furling line has to be small enough to go into the drum.
But, when it is that small, it makes it hard to pull that tiny
line.
The solution was to make it a 1:2 purchase (not to be confused
with a 2:1 purchase). With a 1:2 purchase for every foot of line you bring
in, you actually furl 2 feet of line on the drum. And the line you actually
pull can be large and comfortable on the hands. All I did was run a normal
line through a cleat from the boat, and it went forward. At the bitter
end I attached a turning block. The actual furling line coming from the
drum is led through the turning block and back and attached to a spot
just below the furling drum. (See Diagram)
Now the sail furls in quickly and easily.
A Block for All Purposes
Harken Blocks has been very helpful in this project. Even those of you
out there that refuse to consider the Hooter and will stick to the good,
old, tried-and-true chute, there is a better turning block coming your
way.
In the past, Ratchet blocks have been the mainstay, but have had some
problems. First of all, the more the line contacts the block, the easier
it is to hold. A turn of 180 degrees on the ratchet would be ideal for
ease in holding. However, for the most part the crew's position on the
boat only allows for a partial turn of perhaps 90 degrees to 135 degrees.
The solution in the past is to put another turning block forward on the
leeward hull. Then the sheet is lead through the ratchet block, makes
a 180 degree turn and through the second turning block. This way the sheet
is easy to hold no matter where the crew is sitting.
However, when you jibe/tack, ratchet blocks do not turn, and they alone
make it difficult to get the new lazy sheet to feed through easy and fast.
And a hangup of any kind means a blown jibe/tack. Hangups are caused almost
all the time by too much drag. When you add that second turning block,
you have even more drag then you had with the ratchet block alone.
Harken to the rescue! They came out recently with a block called the "Ratchamatic"
which somehow knows when your pulling on it and when your not. When you
pull on it the block is a ratchet block. When the sheeting pressure is
released the block becomes totally freewheeling. It work awesomely. My
only problem with the new block is that it only comes in the 2" size.
A 3" block would be great.
Still the problem exists of not getting the 180 degree turn on the block.
So, Harken came up with an addition to the block that allows the line
to make that 180-degree turn before it goes to the crew. That way the
crew can be anywhere on the boat and get the best hold possible. And when
the pressure is released there will be no friction whatsoever when jibing/tacking.
Many folks use another turning block up by the jib sheets which also give
the sheet more contact to the block, but then you now require more sheet
and now you have more friction to get the new lazy sheet to feed back
through for jibes and tacks. Also, by having all the sheets up by the
crew area, you will more than likely have the crew either kneeling, sitting
or standing on the new lazy sheet while they are, at the same time, trying
unsuccessfully to quickly haul in the new burdened sheet -- it won't come
in because they are stopping the lazy sheet from going out. When all of
this happens you can count on a blown tack or jibe.
I would rather have all the sheet back by me. During the tack I concentrate
on going to the old leeward side and pulling the new lazy sheet through
to assure there is enough slack before I go ahead and continue the turn.
It is easy for me to stay off the sheet since I am not doing anything
but steering and pulling the lazy sheet through.
By the way the idea of the hexaratchet block in the first place is to
have ratchet power, that turns free-wheeling when you want it to be a
lazy sheet creating much less drag and making the lazy come through much
easier.
The trolley thing I built myself with the advice of Dan at Harken. However,
I believe Harken now makes a product that has the trolley blocks for more
sheet to block surfacing. I don't know the name or number of that block,
but it is affectionately called the Micky Mouse Block because it look
like it two big black ears.
Someone asked about putting cleats on the turning block as we do for jib
sheets, but I really would not recommend that idea -- just remember how
hard it is to release your jib sheet at times when the crew is in the
wrong place.
This added recently: Harken did perfect a a Great Turning Block that does the trick (click on the hot line in this sentence).
You run the sheet through the becket, then around the shieve and through the cleat.
How To Get This Hot New Rig
At this point in time the Hooter System is
ready to go on most classes of boat. However, we need the dimensions
of your boat and this system should fit almost all boats.
The �Rick White Signature Hooter System� consists
of the following:
- Hooter Sail (by Calvert Sails) with all sheets, halyard, special Harken blocks, cleats, and furling systems
- Carbon Fiber Pole with all the wires, shackles
- Installation Instructions
- Small booklet on how to sail the Hooter better.
You can order this awesome sailing system to add more fun and speed to your sailing. Just go to our Shopping Depot. Click Here!
For more information contact <[email protected]>
Assembly Information
Pole Mounting Assembly
When the pole arrives it is in two pieces. This is done for shipping purposes
only � there is no reason to keep it in two pieces and will only cause
you grief in the future � you don't want the pole to ever twist.
So, first epoxy the two pieces together.
Be sure the Rear Fitting is attached so that the Front Fittings will be
perpendicular and then attach them.
Roughly lay out the pole on the boat with the Rear Fitting attached and
then line up Dolphin Striker even with the bows with the Front Fitting
perpendicular. With padding under the Dolphin Striker, glass and epoxy
it in place. You do not want this to twist either way or it could cause
the pole to break.
Now attach the two Spreader Wires and the two Bow Wires to the lower side
of the Front Fitting with the Bow Wires on the outside and on either side
of the Spreader Wires. Now, run the Bow Wires back to the bows of your
boat. It is recommended that you run these wires only to your bow, not
your bridle tangs � the angle is usually too extreme to help the end of
the pole be held in place.
The best way to attach to the bow is to drill ½" holes in
each bow about 2 ½" down from the deck and about 2 ½"
back from the bow. Then epoxy the interior of the hole to seal any possible
leaks.
Through these holes place a loop of non-stretch line with a large stopper
knot � a figure 8 or bigger. When you are not using your Hooter, you can
simply pull the stopper lines out of each hull and you have a clean bow.
Line is better than a bolt or something similar as the pressure is distributed
better on the bow, instead of pulling sideways.
The bow wires attach to the bow loops with line and can be adjusted by
tying tighter or looser.
If you have a Bow Foil as do the Nacras and some other classes, then you
will need a padding between the foil and your pole. Then tie the pole
up tight against the pole with the padding between the pole and foil.
A good idea perhaps is an old beer coolie with the bottom punched out.
If you do not have a Bow Foil, simply attach non-stretch line at one bridle
tang, then do a couple of clove hitches around the pole and tie it off
on the opposing bridle tang. You can adjust the height of the pole up
or down with this line. By the way, I usually replace the bridle wire
pins/circlips with substantial shackles. That gives you something to tie
to and one less area where you need to worry about a circlip coming out
and dismasting.
Next run your Spreader Wires from the bottom of the Front Fitting aft
and attach the Turnbuckle. Then attach the Turnbuckle to the Tang at the
Rear Fitting. Put the wires in the slots of the Dolphin Striker and tighten
to the point there is a few inches of prebend in the pole. For safety
use either rigging tape or electrical tape and thoroughly wrap the wires
onto the Dolphin Striker.
Next, attach small Stabilizer wires to each side of the Dolphin Striker
and tie them off with line to either the Bow Loops on each side or the
Bridle Tangs on each side. This will insure the Dolphin Striker does not
rotate.
Halyard Assembly
Measure up from your hounds on your mast about 30 inches. This is where
you probably need to put the Mast Tang. Many others are running theirs
much higher, but that is all unsupported mast section and this is asking
for a broken mast. Just a side note, Keeping the main sheeted firmly is
the only thing that will keep your mast from breaking. In the Worrell
1000 masts were broken because they mounted their tangs high and then
when a puff hit they ease their mains. That left nothing to keep the mast
in column, and the masts snapped.
Be sure to caulk the holes that you drill for the tang.
Next mount your Mast Base Harken Block with Camcleat near the bottom of
your mast. Most people put them on the starboard side, but that is optional.
Attach your block and run the halyard so that the end that attaches to
the head of the Hooter Sail is outside of all rigging. The other end can
be fed through the mast spreaders and to the block and cleat. Then tie
a stopper knot at the end in the boat, i.e. a figure 8 knot.
Furler Package Assembly
Attach Harken Furler on the top of the Front Fitting with a shackle assuring
that the line feeder of the furler is facing aft
The Top Swivel can be attached to the halyard.
Attach the Harken Cam Cleat and Fairlead to your mainbeam. The starboard
side is normal, but you can put it anywhere comfortable for you.
Next run the small line through the line feed of the furler into the drum
and up through a small hole. Then tie a figure 8 stopper knot. Rotate
the furler so the small line rolls up on the drum neatly. This part needs
a little trial and error to see how much line is needed.
Run the other end of the small line through the Small Bullet Block and
attach it to the Front Fitting below the Furler Drum.
Now the larger line can be attached to the bullet block and run it aft
to the cockpit of the boat, through the fairlead and camcleat.
When running correctly, for every foot of larger line you pull, you will
wind up two feet of smaller line on the drum � this is the 1:2 power ratio.
It is not powerful, but it is fast.
Also, when set up correctly, there will be no sail showing. If fact you
want as bunch of sheet to roll all around it when fully furled. That will
insure it not unwrapping in a blow.
Sheeting Package Assembly
Attach the Ratchamatics on each side of the rear beam, and then attach
the Cam Cleats on the aft side of the beam, behind and slightly off to
the side of the Ratchamatic.
Attach the cam cleats where you will find them comfortable to use on your
particular boat.
The bullet blocks are attached to the clew of the Hooter. When running
your sheet, be sure it runs outside of all rigging, and each bitter end
goes through the bullet blocks and are tied with a figure 8 stopper knot.