Can anybody local suggest somewhere to get closed cell foam and polystyrene foam sheets.
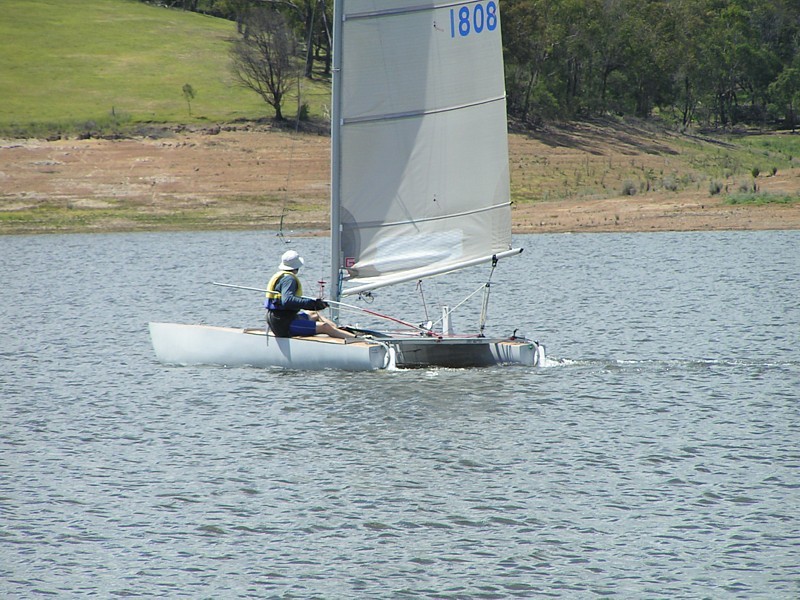
Also, for anyone hanging out for a sail, Winter series at McCrae, Saturdays in July, 1.00pm start. (You can probably guess from my question that I will not be sailing) <img src="http://www.catsailor.com/forums/images/graemlins/frown.gif" alt="" />
Thanks Peter and David, I'll try FGI first as they're just around the corner from my work.
Peter,
It's not a big drama. I sailed with a "crunchy" foam frame for most of last season and I need to replace it as I have cracks in the deck where it has been flexing. I should have done it earlier but I have found myself on the committee for the Yacht club this year and that has taken up a fair bit of time. ( Plus I've been whimping out and putting off cutting a hole in my deck given my lack of knowledege in this area!) <img src="http://www.catsailor.com/forums/images/graemlins/blush.gif" alt="" />
I was considering re-decking the working deck but have decided to go with key-hole surgery. I figure that as long as I get the strength right, any untidy workmanship can be fixed with bog and paint. <img src="http://www.catsailor.com/forums/images/graemlins/confused.gif" alt="" />I am also fitting my new centre boards.
Looking forward to the learning experience and the fumes.
simon do yourself a favour and get some gloves. dont get the M.E.K. on your skin. its a pretty nasty organic chemical. you are better off not reading the MSDS ( material safety data sheet).
Brian Partridge STINGRAY 580 "Fantasia" A Class 585 "FHARKEN A"
YOU CAN'T POLISH A TURD BUT YOU CAN ROLL IT IN GLITTER!!!!!
Yes, It's between the centrboard case and rear beam. I quite like the thought of re-decking as David suggests and replacing all the foam but when you've never done this sort of thing, going solo for the first time is a bit daunting.
Trevor, If you had the time to pop down one weekend and give me some pointers for the first one, I'd be happy to compensate you for your time.
Cheers
Simon Taipan AUS341
Re: Hull Repair
[Re: dkd]
#146132 06/19/0806:49 AM06/19/0806:49 AM
I believe you boat has AJ hulls.....and if so yours is not the only one I know of, with soft working area decks, that is, theones between the beams
It may be prudent to take the decks off and check all the frames....and easier in the long run, than doing it "keyhole"
but in the long run....your call
enjoy it either way, and not that hard a job either way
David
I'd go with David if you look up "stingray deck repair" on thebeachcats.com you'll see the results of keyhole surgery by the previous owner of my old stingray. It works for a while but then can be a total mess. If you can work out how to get your decks off you'll find the rest easy just grind out the cracked foam and put in new foam. I added a layer of divinicell and glass under the decks for hardly any extra weight and bullet proof decks. If you get the prescarfed divinacell it easily flexes to the shape of your deck, just take the deck off support it upside down put in some cloth, some resin add your foam, some weight to push the foam to shape jobs done. regards
Jeff Southall Current boats Nacra 5.8 1703 Animal Scanning Services Nacra 5.8 1667 Ram Raider Nacra 18 Square Arrow 1576
I checked out the reference you gave..... boy, a picture's worth a thousand words. <img src="http://www.catsailor.com/forums/images/graemlins/grin.gif" alt="" />
I have sent you a PM with address and phone numbers. Yes, the freeway opens next Sunday. My boys are at their mothers that weekend and I have the following week off to continue the job, so if next Sunday suits, I'll prepare the operating theatre. <img src="http://www.catsailor.com/forums/images/graemlins/grin.gif" alt="" /> Cheers
Simon Taipan AUS341
Re: Hull Repair
[Re: Trevor]
#146136 06/25/0801:41 AM06/25/0801:41 AM
Notice the join in the stringers.... no support and bugger all glue... Also, its a bit hard to see but the deck support was put in with bog.... no epoxy let alone tape.
All the crap out (except the broken stringers) and time for Trevor and I to head to the pub <img src="http://www.catsailor.com/forums/images/graemlins/grin.gif" alt="" />
Couple of interesting things found. The positioning of the track as per the glass boats, and fibreglass cases.
At this stage the consensus of 2 in my garage was that a proper repair to this area will be all that is required, rather than doing the whole deck. Everything fore and aft of the impact zone seems solid and where it should be.
Plan is some Ply half-frames with t-tops at the joins, cut and insert new stinger lengths to suit, doubling at the joins, and a good number of thick foam frames, epoxied in.
I'll take some happy snaps as I go for anyone interested.
Cheers
Simon Taipan AUS341
Re: Photos... I know you'll ask for some Peter F
[Re: Simon C]
#146140 07/04/0808:07 AM07/04/0808:07 AM
I've waited long enough. <img src="http://www.catsailor.com/forums/images/graemlins/grin.gif" alt="" /> Where's the rest of the happy snaps ?? <img src="http://www.catsailor.com/forums/images/graemlins/grin.gif" alt="" />
Were both hulls having the same problem ? Did this hull have any leaks prior to the surgery and if so have you checked around the centreboard casing ?
Regards,
Peter
Mosquito 1814 Macka Mozzie
Re: Photos... I know you'll ask for some Peter F
[Re: Peter_Foulsum]
#146141 07/05/0801:48 AM07/05/0801:48 AM
I've had the boys home for holidays this week so not much time. Also, I had a bit of trouble tracking down some 3mm Ply, coming in 3 weeks <img src="http://www.catsailor.com/forums/images/graemlins/frown.gif" alt="" /> so I've relaxed off a bit. I'm getting the Bog off from the dodgy repair, bloody hard stuff!
In the mean time, some snaps of the case set up. Not what I expected to find.
Will hopefully make some more progress this week
Cheers
Simon Taipan AUS341
Re: Photos... I know you'll ask for some Peter F
[Re: Simon C]
#146142 07/05/0801:49 AM07/05/0801:49 AM
I've been a bit slack but have progressed. I seem to have fixed that problem on the inside near the front beam where the tramp had pulled the ply away a bit. It don't think it was too serious as none of the epoxy came through to the inside when I injected it. I found a cheap large clamp at Bunnings that was big enough to negate the curve of the deck and it seems to have done the job.
As for the big job! I had some practice goes with varying mixtures of epoxy on some scraps so I could get the feel of things, and have now taped in the foam around the case that was loose. I had a bit of trouble getting a nice straight edge on the hole without cutting into the stringers but have now got it pretty neat.
Getting the frame from the bodgy repair out was a bugger of a job with all that bog.
I'll do a bit more this weekend but next weekend I am kid free so I plan to get a fair bit completed.
I've got my timber for the new stingers and frames but still await the arival of my 3mm ply.
I'll post some more photos after the big weekends work.
Repair nearly finished but I have been filling in the "Curing Time" with fitting some new boards.
Question:
With the new boards seated in the correct position against the back of the case I now have a 2cm gap (tapering to nothing as you move aft) on the bottom of the hull. What is a good "fast" method to fill this and how crucial is the fit. (i.e. how tight should it be?)
All tips welcomed.... I'm running out of time <img src="http://www.catsailor.com/forums/images/graemlins/blush.gif" alt="" />
P.S. I have spoken to the weather gods and have been assured that the winds will be perfect for the Cat Classic this year (Nov 1-2) Apparently all I have to do is sacrifice a virgin under the light of the next full moon.
I tried this method for last year but I guess she must have been telling fibs. <img src="http://www.catsailor.com/forums/images/graemlins/grin.gif" alt="" />
I think the method is to turn the boat upside down, put the boards in with one or two layers of plastic shopping bag wrapped around them where the board meets the boat. Then you push some thick epoxy filler into the gap and wait for it to set - make sure the boards are pointing straight forwards while the epoxy sets.
Take the boards out and fair in the filler.
There may be other refinements to this process - I've only replaced bits of filler like this. I've never done the whole lot.
Most Mozzies seem to be done this way, though I wonder why more are not set up with a much bigger gap between the board and the case (like 2-3mm) so some sort of hard felt or similar material could be put in there. This would surely end up putting less scratches in the boards. Anyone know why Mozzies don't do this?
It's very quiet in here so I thought I'd do an update on my repair.
I have replaced and or reglued the foam frames around the case and completed the rebuild of the section. I made two 4mm ply and balsa wood sandwiches as short frames on which to join the stringers. Then replaced the thin foam frames that were there with three 38mm foam frames.
I'm hoping this will be much stronger than the original but hasn't added too much wait.
I glued the deck piece on tonight. Had some dramas there as those who know the boat might recall that the track for the tramp is inset into the inwhale to work in the same fashion as the glass boats. I learnt an good lesson at an inappropriate time..... Copper nails will not hammer through aluminium track <img src="http://www.catsailor.com/forums/images/graemlins/blush.gif" alt="" />
Here are some happy snaps of the internal structure.
I'll post some of the deck in place when it's dry and I've had a chance to tidy it up. <img src="http://www.catsailor.com/forums/images/graemlins/shocked.gif" alt="" />
I still have fitting the new boards to complete and of course a bit of painting.
I hope to be back on the water by the weekend after next.
Not sure I'll be chasing a career in boat building <img src="http://www.catsailor.com/forums/images/graemlins/confused.gif" alt="" /> but it has been an interesting learning curve.
Thanks to those who have provided valuable advice during the project. <img src="http://www.catsailor.com/forums/images/graemlins/grin.gif" alt="" />
I learnt an good lesson at an inappropriate time..... Copper nails will not hammer through aluminium track <img src="http://www.catsailor.com/forums/images/graemlins/blush.gif" alt="" />
So did you just keep hammering anyway ??? <img src="http://www.catsailor.com/forums/images/graemlins/wink.gif" alt="" />
Is that a doona and matress in the backgroun for you to sleep on ? <img src="http://www.catsailor.com/forums/images/graemlins/laugh.gif" alt="" />
I reverted to stainless screws. I never liked them on the inside of the deck and was hoping to do away with them. Now I know why they were there <img src="http://www.catsailor.com/forums/images/graemlins/shocked.gif" alt="" /> If I'd thought ahead I could have drilled small holes for the nails but alas the glue was on and I had the other side nailed.
Any Somers lads coming to the cat classic this year?
looks good, see you at the cat champs. on that who is going to the cat champs would be good to sail against some mossies some time, every time i have been out this season it has been against fleets of Tiapans.
Good to see it is nearly all done..and now for the fun part, the centreboards.
I have now done/or had done several sets and not hard, just care to be taken.
If you want the way i did mine drop me a line and will send you the details, I am not home until end of next week, (at sea) but happy to help from then, might even get out for a sail myself.
Basically as Tim described it a while back but I use a lot thicker plastic sheet and a slightly easier way of stopping the filler running down the inside of the cases and making a bigger bloody mess than needed.....enjoy either way and maybe we will see you at Wallaroo.
Hi David.
Yes nearly done.
I've posted a photo of the deck piece done with one coat of paint thus far. 2pac paint is a harsh judge! but not withstanding the fill job, I am very happy with the strength of the deck.
I was planning to wrap a board in multiple layers of cling wrap for the bog job. Seemed like a good way to ensure no leaks. I did a test to make sure the epoxy doesn't eat the plastic and it all looks good.
As for the bog bit. I am going to do it from underneath. With all the various pots I've mixed thus far I have noticed that using Micro Balloons as the filler rather than talc you seem to be able to get a really good paste whith virtually no sag. The pot life is a bit short in this state but I plan to do one at a time and perhaps some masking tape to make sure.
Cheers
Oops! can't see where you upload a file in the new forum. Photo might have to wait.
When I did mine I used brown packing tape on the board around the area in question, a couple of layers would be fine.
I held the boards in position by inserting packers using slithers of timber I had around.
Turned hulls upside down then carefully pushed some styrofoam cut into long thin wedges to match the profile of the board, then I filled in around the board with the filler mix not too runny and not to thick, the foam stopped the filler from going through too far, and when I tapped out the board, you can break out the foam, even if it leaves a bit in there, it is clean itself out eventually pulling/pushing the boards in/out.
I hope thats sort of a clear description.
Regards
Matt Harper
Homebuilt Taipan 4.9
AUS 329 'GOT WOOD' SEEDY PIRATES RACING TEAM
Here's a photo of the finished result with new board in place.
The finish is not as neat as I would have liked but frankly, I just wanna go sailing! I am putting every thing back on tonight and will be on the water tomorrow. Yippeee!!
Hey Trev, I reckon you should have some news by now????
I found the cause of my deck cracking probs. The ply has pulled away slightly at the inside of the front beam (see attached photo) and as it flexes, it cracks the deck and lets in water. I was going to leave it till winter but I took on a fair bit of water in Saturdays "fresh" conditions so I thought I'd fix it before the states.
My thoughts are to use a syringe to get as much epoxy in as possible and then clamp, followed by a tidy up with some filler on the deck cracks. Will this do the job or is there a better method?
Good to see that you found where the water was getting in.
It looks like it is water saturated or is that just my imagination. You may also need to consider using everdure to penetrate the ply then epoxy the joint.
Simon, If I understand you correctly this part of the hull can experience quite high compression loads from the rig as well as coming off waves or big chop.
Given that I would also put a layer of 200gm glass over the crack after taking back to bear timber. When loaded up if the ply wants to seperate again the glass will prevent it even more affectively that injecting a resin glue mix. However I would do both.
Regards, Phill
I know that the voices in my head aint real, but they have some pretty good ideas. There is no such thing as a quick fix and I've never had free lunch!
I noticed the photo of cracking on your hull and thought I should speak up.
I repaired a similar crack on my hulls with carbon fibre on the inside of the hull. The inside ply had a slight crack about 15mm long running down it too. The bow broke off eventually with what we suspect was the inside ply buckling right on the crack.
This needs to be repaired properly, and you might as well do both hulls at the same time.
Thanks for the input guys. The hull has been reinforced with a false deck in this area and everything seems solid as internally. (Had a prod and a good look round with a mirror.)
I think the area in question has been that way for a while and given the generally heavy conditions we've had this season I would guess that any structural damage would have occurred by now.There is no sign of any damage down the side of the hull, inside or out. OR... I could be completely wrong. (I guess time will tell)
Ben... I'm having far too much fun learning all these new skills to give up on the old girl just yet. ( though I suspect that if I had $8000ish lying around those hulls might no longer be available.)
Have been doing some repairs and strenthening to mossie especially to carry kite.
My hulls appear to have carbon mat on inside in front of main beam bulkheads - see pic 1.
Have already relaid 200g 50mm tape along bottom keel from centreboard to bow, run a 50mm tape along outside gunwhale, reinforced side stay and bridle fixing points and pole brace points at bows. See extra pics.
What are thoughts on anything further? - carbon to outside of hulls in front of main beam, tape along inside gunwhale?
Want to achieve enough strength without going overboard and adding unreasonable weight.
Generally speaking, there is no point adding carbon to plywood to increase strength. Plywood is so much more flexible than carbon that the carbon ends up taking practically all the load. If there isn't enough carbon to take all this load it can break and leave you where you started.
Much better to use fibreglass, it has similar stiffness to plywood.
On a productive note, some uni fibreglass down the inboard gunwales from cb case to bridle (roughly) might not go astray.
The kite isn't necessarily the greatest load on the bows.
Went with glue and glass. I excised timber beyond the crack and was pleased to see it went no further than it looked.
What does everyone use for sealant when putting the beams on. I had sikaflex-291 recommended by my shop but on reading the specs it seems to have a very long cure time? If it's good I'll use it but I was hoping to be back on the water by the weekend.
Just a small circular bead of sika around the bolt holes is enough. Should be right by the weekend, but give the bolts another tighten before rigging up.


![[Linked Image]](http://www.catsailor.com/bb_files/149770-IMG_0321.JPG)


![[Linked Image]](http://www.catsailor.com/bb_files/159862-IMG_0392.JPG)
![[Linked Image]](http://www.catsailor.com/bb_files/159863-IMG_0391.JPG)