| |  Re: Self tacking jib track
[Re: Cheshirecatman]
#207213 Re: Self tacking jib track
[Re: Cheshirecatman]
#207213
03/31/10 04:10 AM 03/31/10 04:10 AM |
Joined: Jul 2007
Posts: 976
France pepin 
old hand
|
old hand
Joined: Jul 2007
Posts: 976
France | .
Last edited by pepin; 03/31/10 06:52 AM. Reason: Duplicate post...
| | | Re: Self tacking jib track
[Re: TeamChums]
#207230
03/31/10 09:51 AM 03/31/10 09:51 AM |
Joined: Apr 2003
Posts: 67
Daytona Beach Jeff_Bowers
journeyman
|
journeyman
Joined: Apr 2003
Posts: 67
Daytona Beach | If you add a smaller self tacking jib to a cat that uses a large jib, how will it effect the rest of the boat. Center of effort? mast rack? weather helm?
Jeff Bowers
Mystere 6.0(sometimes XL)
| | | Re: Self tacking jib track
[Re: Jeff_Bowers]
#207241
03/31/10 11:00 AM 03/31/10 11:00 AM |
Joined: Jul 2007
Posts: 976
France pepin
old hand
|
old hand
Joined: Jul 2007
Posts: 976
France | If you add a smaller self tacking jib to a cat that uses a large jib, how will it effect the rest of the boat. Center of effort? mast rack? weather helm? Depends. Replacing a large overlapping jib with a tiny one is sure going to change things. But then you may play with the jib luff for example, making it longer going down all the way to the spi pole, and as such not losing that much jib area. | | | Re: Self tacking jib track
[Re: pepin]
#207242
03/31/10 11:15 AM 03/31/10 11:15 AM |
Joined: Nov 2003
Posts: 749
Santa Cruz, CA SurfCityRacing
old hand
|
old hand
Joined: Nov 2003
Posts: 749
Santa Cruz, CA | Or call your nearest Hobie or Nacra dealer: they can sell you parts from a WildCat/Tiger/Infusion. Yep, there are several different styles available. | | | Re: Self tacking jib track
[Re: Jeff_Bowers]
#207244
03/31/10 11:32 AM 03/31/10 11:32 AM |
andrewscott
Unregistered
| andrewscott
Unregistered
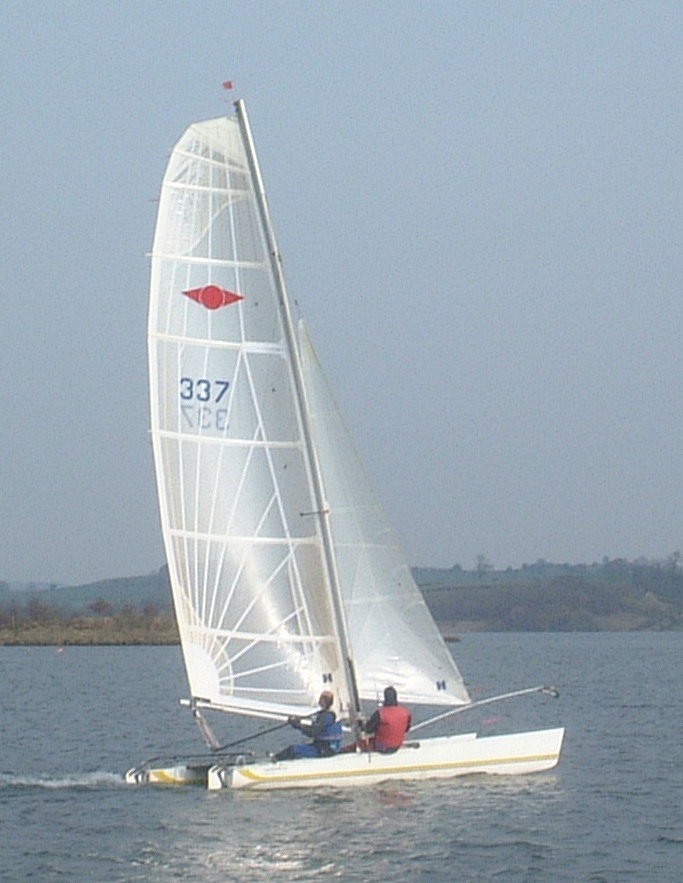
| If you add a smaller self tacking jib to a cat that uses a large jib, how will it effect the rest of the boat. Center of effort? mast rack? weather helm? The T's did it when they went to a self tacker.. might be a good question for that forum? We have a mystere 5.5 (zack) that added a T rig, and self tacker (and 10' beams). He depends on his reaching spin for downwind more than we have to, but he does well upwind with his FrankenRig | | | Re: Self tacking jib track
[Re: TeamChums]
#207253
03/31/10 12:51 PM 03/31/10 12:51 PM |
Joined: Aug 2002
Posts: 74
Fulshear, TX SGalway OP
journeyman
|
OP
journeyman
Joined: Aug 2002
Posts: 74
Fulshear, TX | Shannon, KO Sailing can get you the parts you need. Call me if you need, I can help. Yeah... I always try to avoid KO ever since he port tack T boned me in a V15. We were shootin' bullets out our butt at the Elissa regatta several years ago. In the second to last race he T-boned me and never even acknowledged the collision much less offered to help fix the gaping hole in the side of my boat. I won the protest, but lost the regatta... To this day I have not spent a dime in his store. | | | Re: Self tacking jib track
[Re: TurboCat]
#207260
03/31/10 03:13 PM 03/31/10 03:13 PM |
Joined: Aug 2002
Posts: 74
Fulshear, TX SGalway OP
journeyman
|
OP
journeyman
Joined: Aug 2002
Posts: 74
Fulshear, TX | Yo sgalway did you ever get that PM i sent you? I did get it. Sorry I haven't got back to you. I am headed to China on Monday and won't be back for a week or so. I will PM you with details. | | | Re: Self tacking jib track
[Re: TeamChums]
#208621
04/16/10 09:31 AM 04/16/10 09:31 AM |
Joined: Aug 2007
Posts: 70 ButchG
journeyman
|
journeyman
Joined: Aug 2007
Posts: 70
| Trying to do this to my P19 too. The $700 price tag for an OEM New system is a little daunting though. Hangin out in the shopper and flea market forums with great hopes for a part out boat  My budget this year went to changing out my Prindle rudder system for a N20 system. Pics to follow.....
"There are four boxes to be used in defense of liberty: soap, ballot, jury, and ammo. Please use in that order."
ButchG
Prindle 19 w/Spi
| | | Re: Self tacking jib track
[Re: SGalway]
#208986
04/20/10 06:08 PM 04/20/10 06:08 PM |
Joined: Mar 2006
Posts: 337
Arizona AzCat
enthusiast
|
enthusiast
Joined: Mar 2006
Posts: 337
Arizona | Made my own. works great. I dont know how much of the process was luck and how much was skeells tho.
Let me know if you want to know how I did it and I'll write something up. I think i took some pics of the process also.
radius needs to be pretty close, if not perfect or the track wont work well.
Auscat MKV 444 A class
NACRA I-20- 440/CATHATKA
| | | Re: Self tacking jib track
[Re: AzCat]
#208987
04/20/10 06:25 PM 04/20/10 06:25 PM |
Joined: Aug 2007
Posts: 70 ButchG
journeyman
|
journeyman
Joined: Aug 2007
Posts: 70
| VERY interested, Azcat, in how you did it. Materials, plans, pics. . .all that stuff  Maybe a "How To" on Beachcats Tech Album?
"There are four boxes to be used in defense of liberty: soap, ballot, jury, and ammo. Please use in that order."
ButchG
Prindle 19 w/Spi
| | | Re: Self tacking jib track
[Re: ButchG]
#209054
04/21/10 11:08 AM 04/21/10 11:08 AM |
Joined: Mar 2006
Posts: 337
Arizona AzCat
enthusiast
|
enthusiast
Joined: Mar 2006
Posts: 337
Arizona | OK, I will be racing this weekend but will start putting something together. I have to tell you though, the process seems to involve a good deal of chance.
Mine turned out very nice. especially since I think I spent under $50 for everything. i used mostly existing parts from my 6.0.
I'll get something together.
Auscat MKV 444 A class
NACRA I-20- 440/CATHATKA
| | | Re: Self tacking jib track
[Re: SGalway]
#210744
05/11/10 03:53 PM 05/11/10 03:53 PM |
Joined: Mar 2006
Posts: 337
Arizona AzCat
enthusiast
|
enthusiast
Joined: Mar 2006
Posts: 337
Arizona | OK, sorry it took me so lomg to get back to writing this.
Lets see, what did I do?
Ok. First off, My N6.0 came with a self tacking jib track attached to the front of the main beam. It was straight so it obviously didn’t work like it was intended to. But that gave most of the parts I needed to make my own.
1) 5’ track
2) Small traveler.
3) Screws that held the track to the front beam (will be used to hold the track to its backer)
I had to make a curved piece of aluminum to attach the track to. I went to a couple of machine shops, they told me that they couldn’t effectively ie cheaply bend what I needed. They told me it would be a hit and miss /T&E project that would end up being at least a couple hundred bucks. Hell, I can do trial and error as good as the next guy!
So I bought a piece of
4) 1”x1”x 1/8” wall T-1 aluminum, 7’ in length.
(Aluminum is fun to type, just like Catamaran! Maybe its because I use two fingers.) You will need 5’ but buy an extra 2 ft of material, this will help you later.
5) 2- 12’ 2x12 Hem fur if you can find it, Doug fur if you can’t. Hem has a finer grain ei cuts more easily and smoothly. No large knots.
I figured that the 1x1 aluminum stock would have some spring to it, but I didn’t know how much. I set the boat up and took a measurement from the shortest point between the forestay and the front of the main beam, 75”.(about 2’ up the forestay on my boat. This is also the point that is square with the front beam.)
I wanted the track assembly to be about 1”off the beam, took that measurement, and added 1” for the square stock, giving me 2”. I added another ½” for the thickness of the track.(which is 7/8”x 1/2” approx) gives me 2 ½”
75”-2 1/2”=72 1/2” radius to the front of the track.
I then swung a 72.5”radius line on the shop floor with a pencil for reference.
Again, I figured on some spring in the 1x1 Alu. stock, but didn’t know how much. Also, I didn’t know if the 1x1 would collapse if I tried to bend it completely in one jig.
So I cut a 74” radius in a 6’ piece of the 2x12. , leaving about 3.5 inches of meat at the top outside of the radius. Ie, I swung the radius using the bottom corners of the 2x12 as the endpoints of the radius. I hope that’s clear. This gave me two solid pieces of material for the jig.
I set up two saw horses w a piece of plywood for a work area. Laid 3 - 4’ bar clamps on the plywood. Laid the jig on the clamps. Set the 1x1 stock between the jigs and started clamping. It wasn’t easy. In fact the 1x1 aluminum was winning the battle. So I took it out of the jig and got out my plumbing torch and heated the 1x1 up till I figured that it might be hot enough to make a difference. My understanding is that you can heat it to about 850 degrees without damaging the metal; I just kept the torch moving. I put the 1x1 back in the jig and continued to clamp, it worked like a charm. Bent like butter. Well, like not real soft butter, but I won the battle.
I took it out of the clamps and, yes, it sprung back quite a bit. Each time I took the 1x1 out of the clamps, I re-clamped it at the very ends of the stock. This is where the extra material is needed. The very end of the stock will not bend.
So, I cut the next 2x12 at a 56”radius. Repeated the heating etc and as luck would have it, got the desired bend. Each time I would lay the metal on the radius that I had swung in the shop floor to see how close it was to the radius I wanted. It was perfect, right on the line.
Next, I had to bend the track. This stuff is unbelievable. T-6 aluminum does whatever it likes. Noteworthy, my track had holes predrilled in it from the factory at about 6”oc. At each hole, the track will make a slightly sharper radius than the rest, If you feel comfortable drilling your holes after the bending process, it would be better. But, mine works beautifully the way it is. I haven’t noticed any adverse effects and most wouldn’t notice unless they were told specifically to look at it closely. Even then, most people ask me what the hell im talking about. It works, Im happy.
I put the track in the first jig that I had cut, clamped it up, took it back out, still straight. Put it in the second jig and clamped it up. Took it back out, bent about three inches over the 5’ of length. So, I cut another jig at a 45” radius. Clamped it up, took it out, and still barely bent. I didn’t know at what point it would just kink or snap, so I tried something else. Oh, also, I didn’t want to heat this and lose the T-6. That may be an option for you.
I clamped the track to the inside edge of the 1x1 with about 6 or 8 clamps so that it fit tightly together and found that the track bent the 1x1 back straight quite a but. So, I went for the Hail Mary. I grabbed a 6’ bar clamp (the clamps are the cheap 1”gas pipe clamps) and clamped it on the 1x1 stock from end to end, putting it in compression and bending it like a bow… or like a downhaul on a mast. Again, I worked out in my head how much I thought the track would spring the assembly back straight after being laminated together with screws and Marine Goop. I clamped it together about 2 ½ to 3 inches and then put a bead of Goop down the 1x1, clamped the track back onto it, starting in the middle and working toward the ends. One at a time, starting in the middle and working to the ends, I drilled and tapped holes for the screws and installed the screws, each time, making sure that the material was clamped tight and centered. When I took off the clamps, and laid the track once again on the optimum radius I had swung on the shop floor, It was within 1/8” of the line. I put on the traveler and end caps, cut it to length, sanded any rough or sharp edges and corners, ready for mounting.
A couple weeks earlier, I had replaced my diamond spreader bars. I saved the old ones just in case. I used them to attach to the main beam.
I snapped a line on the shop floor 2 1.2 inches behind the radius that I had swung for the track. This line would represent the front main beam of the cat. To get this, you can first snap a line from the center of the radius point across the 72.5 rad line you swung earlier. Make sure to snap it well past the radius line. Measure 2 1/2“ past the intersection of these two lines and make a mark. Use a square to mark another line perpendicular to the line you have just snapped, intersecting at that mark. Use a long straight edge or chalk line to extend that line 4’ on each side if the mark. This is the line that represents your front beam.
Measure the length of the new track as the crow flies. I didn’t want the mount to be right at the end of the track, so I subtracted 5” from each end for a total of 10” from the length of the track. Divide that # by three. This will give you the positions of your attachment points. Start from the center and work out to the ends. This gives you 4 attachment points.
On the shop floor, mark out these attachment points on the track and beam lines you marked out. The marks will run perpendicular to the line representing the beam. Mine ended up to be 16” apart. Starting at the center I measured 8” in each direction, then from that mark, an additional 16” along the beam line. Then I squared out to the track line. These marks represent the centers of the attachment bars. I laid the track on the line, and marked these lines on the back side if the 1x1, squared them across the 1x1, and found the center of the 1x1 where it intersected that mark.
At this time, I also swung another radius outside the line representing the front of the track. This line was 5/8” outside the original track line and represented the inside wall if the 1x1 stock. I then took the old diamond spreader bars, laid them across these lines and on the lines that I marked for the attachments which gave me a rough length measurement. I cut them a little long at first. It also gave me the angle at which I needed to drill 1/2” holes in the back side of the 1x1 for the attachment rods to go through. I wanted the holes to be a tight fit for the rods. I also beveled the ends of the rods to fit all the way into the holes, and tight against the 1x1 inner wall. I drilled and beveled everything, and then drilled holes for
6) 4- #10x1 ½” stainless bolts w nylocks
down through the 1x1, through the end of the rods which were inserted into the ½” holes in the back of the 1x1, and through the back side of the 1x1. .Make sure that the rods are held at the proper angle so that they are square with the main beam after assy. Very important. Bolt the assembly together and lay it back on the marks on the floor. Mark the cutoff length of the attachment rods 1/8” away from the main beam line. Cut the rods square. Bevel these ends and sand smooth.
Next, I had to figure a way to attach to the front of the main beam. I took some of the cutoff square stock, and cut one of the walls off so it ended up a channel instead of a square. Im not going to tell how I did this, because I don’t want to be responsible for anyone missing a hand etc. A hack saw and a bench vice should work fine though.
After I ripped the top off a piece if the sq stock, I cut it into pieces 1 ¼”long. These would be mounted to the front beam. I then beveled and rounded them so that they had no sharp edges, and drilled a hole in each of them, and through the attachment rods, big enough for an attachment pin to run through, I used
7) 4 - 1 ¼ x ¼ pins w rings (Could possibly use smaller diam., its what I had on hand.)
I then located the place that I wanted to mount the assy. on the beam, drilled holes for riveting the channel pieces to the beam. Put some Goop on the back of the channel pieces and riveted them in place. The channels are flat on the backside, the beam is round, the Goop hardens to make a semi flexible base mount between the two.
PREST-O-CHANGE-O
Prepare to self tack!
Wind is up, Im done writing!
Auscat MKV 444 A class
NACRA I-20- 440/CATHATKA
| | |
| |
0 registered members (),
13,849
guests, and 619
spiders. | | Key: Admin,
Global Mod,
Mod | | | Forums26 Topics22,406 Posts267,062 Members8,150 | | Most Online15,494
44 minutes ago | | |